How to Use Ply3rs
Everything you need to know — from setting up your first playlist to streaming radio from 120+ countries.

Getting Started
Download the app
Install Ply3rs from Google Play. It's completely free — no sign-up, no account needed.
Open Ply3rs
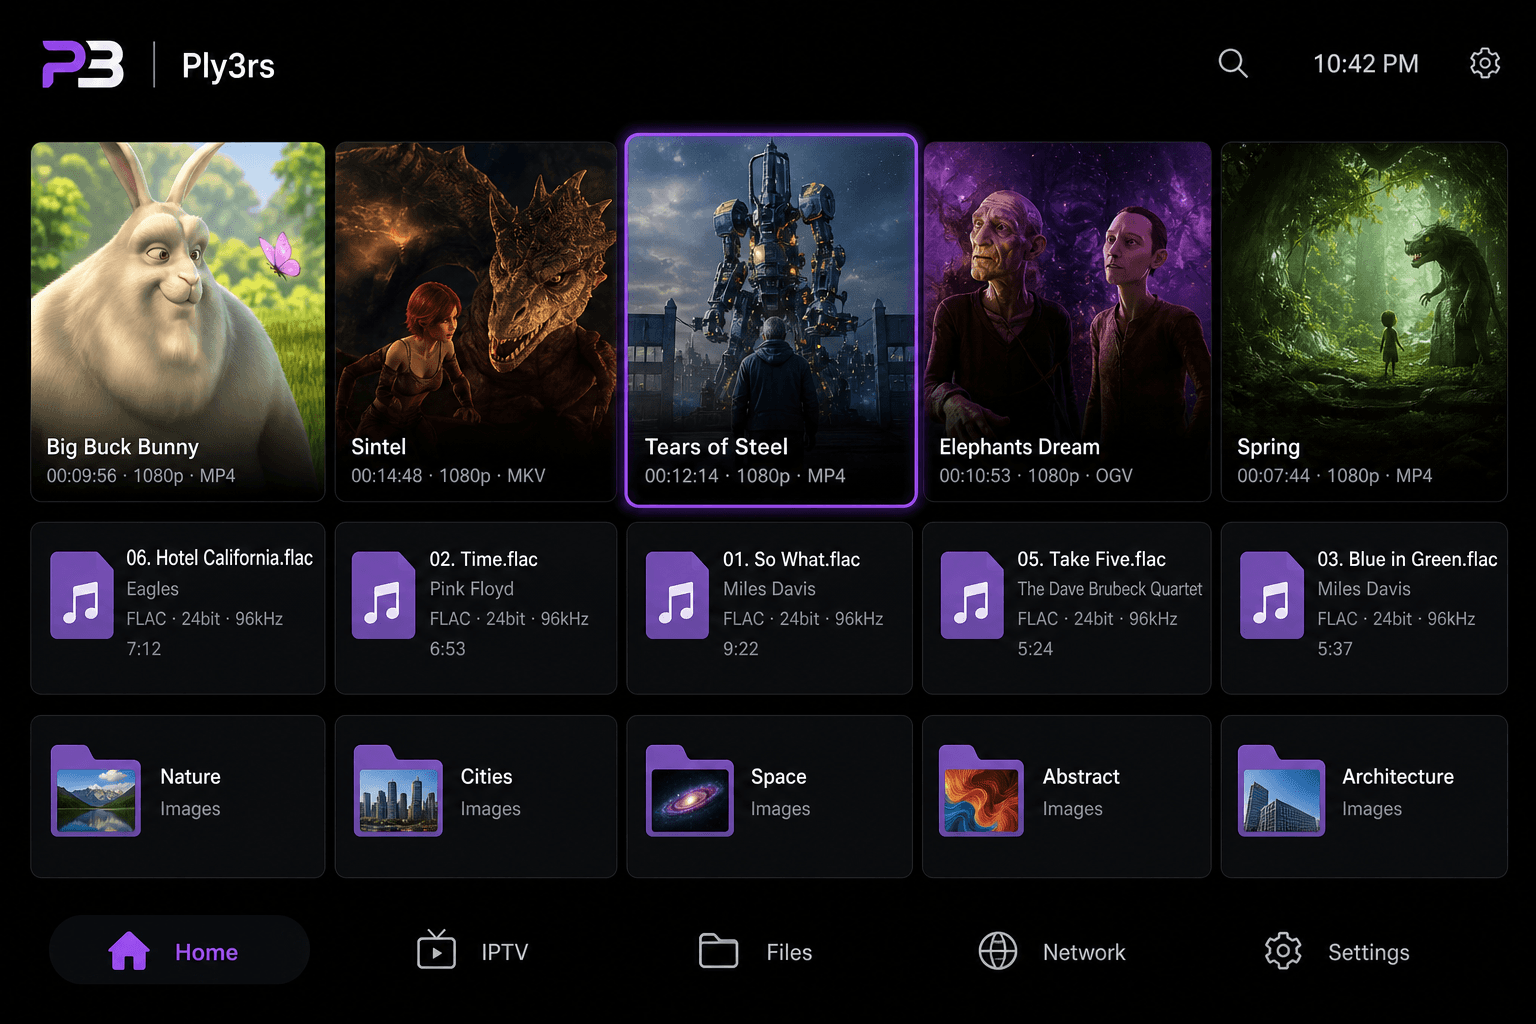
On first launch you'll see the welcome screen. You can add content from the toolbar icons at the top.
Choose your content type
Use the toolbar icons: 📡 IPTV playlist · 📁 Files & Storage · 🎙 Radio. Each opens a different feature.
No account or login is required. Your data stays on your device.
IPTV Playlist
Tap the IPTV icon (📡) in the toolbar
This opens the Add Playlist screen where you can add your M3U URL or Xtream Codes credentials.
Option A — M3U URL
Paste any M3U or M3U8 playlist URL into the field. Give it a name and tap "Add". Ply3rs will download and parse all channels automatically.
Option B — Xtream Codes
Switch to the Xtream Codes tab. Enter your server address (e.g. http://server.com:8080), username, and password, then tap "Add".
Browse & Play
Your channels appear in a grid. Tap any channel to play it instantly. Use the search bar to find channels by name.
Favorites
Tap the ♥ icon on any channel to save it as a favorite. Filter to only show favorites with the heart button in the toolbar.
Refresh playlist
Tap the refresh icon (🔄) on any playlist to re-download the latest channel list from the source.
You can add multiple playlists — each is shown as a separate section on the home screen.
LiveTV
Open LiveTV from the home screen
Tap the LiveTV card on the home screen. This opens a curated list of free, legal public broadcast channels — no playlist URL needed.
Browse channels by region
Channels are grouped by region: International, Europe, Americas, Asia, Middle East & Africa. Scroll down to explore all regions.
Tap any channel to play
Tap any channel name or thumbnail to start streaming instantly. The built-in player opens in full-screen with standard controls.
What's available
35+ verified public broadcast channels including news, science, documentary, culture, and general entertainment. All streams are free and publicly available.
LiveTV channels are free, legal public streams — no subscription required. Channel availability may vary by region or network.
World Radio
Tap the Radio icon (🎙) in the toolbar
This opens the World Radio screen with 120+ countries organized by region.
Choose a country
Scroll through the country grid. Middle East & North Africa countries (🇮🇱 🇸🇦 🇦🇪 🇪🇬 🇯🇴 🇱🇧 etc.) are shown first, followed by World.
Select a station
A list of the most popular stations appears for that country. Each station shows its name, genre/tags, and language.
Tap to play
Tap any station (or the ▶ button) to start streaming. The station shows a purple glow and animated bars while playing.
Go back
Use the back arrow to return to the country list and pick a different country.
All radio stations are sourced from Radio Browser — a free, open-source, community-maintained directory of public radio stations. No account needed.
Network Storage
Tap the Folder icon (🗂) in the toolbar
Opens the Files & Storage screen where you can add network drives.
Tap 'Add network drive'
Choose your protocol: SMB (Windows shares), NFS, FTP, or HTTP.
SMB example
Enter the path as: smb://192.168.1.100/SharedFolder — then add a display name, optional username and password.
Browse & stream
Once added, tap the drive to browse its folders. Tap any media file to stream it directly from your NAS or PC.
Make sure your device is on the same Wi-Fi network as the NAS or PC you're connecting to.
Cloud
Tap the Cloud icon (☁️) in the toolbar
Opens the Cloud Source screen. Supports Google Drive, OneDrive, Dropbox, Amazon Photos, WD My Cloud, and any direct URL.
Paste a share link
Copy the share link of a file from Google Drive (or any other service) and paste it here. Ply3rs converts the link to a streamable URL.
Or pick from a local app
Tap 'Pick from device' to open a file from an installed cloud app (Google Drive, Dropbox, etc.) directly.
Google Drive links are automatically converted to direct download URLs for seamless playback.
Local Files
Tap the Files icon (📄) in the toolbar
Opens your device's file picker. Browse to any folder and select a media file to play.
Supported file types
Video: MP4, MKV, AVI, MOV, WMV, TS and more. Audio: MP3, FLAC, AAC, OGG, ALAC. Images: JPEG, PNG, GIF, HEIC, WebP, RAW.
Read text & source code
Ply3rs opens any text or source code file in a built-in viewer — over 250 languages and formats including Python, JavaScript, TypeScript, Kotlin, Java, Swift, C/C++, Rust, Go, PHP, Ruby, JSON, YAML, XML, Markdown, shell scripts, config files and many more.
Play from anywhere
You can also share files from any other app (Files, Gallery, Downloads) — just choose 'Open with Ply3rs'.
Ply3rs can play files directly from USB drives, SD cards, and any storage your Android device supports.
Photo Gallery
Open Photo Gallery from the home screen
Tap the Photo Gallery card. Ply3rs accesses your device's media library and displays all photos and images organized by album.
Browse your albums
Photos are grouped by album (Camera, Screenshots, Downloads, etc.). Scroll through thumbnails to find the image you want.
Tap any image to view it
The built-in image viewer opens with pinch-to-zoom, swipe to navigate between photos, and a full-screen mode.
Supported formats
JPEG, PNG, GIF, WebP, HEIC, HEIF, BMP, TIFF, and RAW formats (DNG, CR2, NEF, ARW, etc.) are all fully supported.
Open files directly
You can also open any image file from Local Files, Network Storage, or Cloud by tapping it — Ply3rs will open it in the image viewer automatically.
Ply3rs supports RAW camera formats that the default Android gallery app often cannot open — including DNG, CR2, NEF, ARW, and more.
Code & Text Viewer
Open any text or code file
Tap any text file from Local Files, Network Storage, or Cloud. Ply3rs automatically detects the file type and opens it in the built-in Code & Text Viewer.
Syntax highlighting — 250+ languages
Source code is displayed with full syntax highlighting. Supported: Python, JavaScript, TypeScript, Kotlin, Java, Swift, C, C++, C#, Rust, Go, PHP, Ruby, Dart, Lua, R, Scala, Perl, Bash, PowerShell, SQL, HTML, CSS, JSON, YAML, XML, TOML, Markdown, and 200+ more.
Open from any app
Share any text or code file from another app (Files, email, browser) and choose 'Open with Ply3rs' to view it in the code viewer.
Scroll and zoom
The viewer supports smooth vertical scrolling through large files, and horizontal scroll for long lines. Pinch to zoom in/out on the text.
Supported file extensions
.py, .js, .ts, .kt, .java, .swift, .c, .cpp, .h, .cs, .rs, .go, .php, .rb, .dart, .lua, .r, .scala, .sh, .ps1, .sql, .html, .css, .json, .yaml, .xml, .md, .txt, .log, .csv, .ini, .cfg, .env, .toml, .gradle, .dockerfile, and many more.
The Code & Text Viewer works entirely offline — no internet required. Great for reviewing code, config files, and logs stored on your device or NAS.
Custom Skins
Open Skins from the toolbar
Tap the Radio icon in the top toolbar, then tap 'Skins' in the menu — or go to Settings → Skins. The Skins screen shows all available themes.
Choose a theme
Three themes are currently available: Default (dark purple), Dark (pure AMOLED black), and Light (clean white). Tap any theme to preview it instantly.
Apply the skin
Tap 'Apply' on your chosen theme. The app's colors, backgrounds, and accents update immediately — no restart needed.
40+ skins coming soon
The skins library will expand with 40+ unique themes including AMOLED Night, Ocean Blue, Sunset Orange, Forest Green, Neon Cyan, Rose Gold, and many more.
Sync across the app
Your chosen skin applies to every screen in the app — home, player, playlist browser, radio, files, and settings.
Skins are stored locally and load instantly. Your skin choice is saved and restored automatically every time you open the app.
Player Controls
Basic controls
Tap the screen to show/hide controls. Play/Pause, seek bar, volume, and brightness are accessible with a single tap.
Gesture controls
Swipe left/right to seek. Swipe up/down on the left side for brightness, right side for volume.
Aspect ratio
Tap the settings menu (⚙) to change aspect ratio: Fill, Fit, Stretch, 16:9, 4:3.
Playback speed
Adjust speed from 0.25x to 4x in the player settings menu.
Sleep timer
Set a sleep timer (15 min, 30 min, 1 hour, end of video) so the app stops automatically.
Picture-in-Picture
Tap the PiP button to float the video in a small window while you use other apps.
Audio & subtitles
Switch audio tracks and subtitle tracks directly from the player controls.
On Android TV, use the D-pad to navigate. Long-press OK for the settings menu.
Android TV
Install from Google Play on your TV
Search for 'Ply3rs' in the Google Play Store on your Android TV, Fire TV Stick, or any Android TV box.
Navigate with the remote
Use the D-pad (up/down/left/right) and OK button to navigate. All features are fully accessible via remote control.
Add playlists & network drives
Same process as on the phone — add M3U playlists or Xtream Codes. Your content appears in a TV-optimized grid.
Play
Press OK on any channel or file to start playback. Press Back to return to the home screen.
The TV interface is automatically enabled when the app detects an Android TV device — no extra setup needed.
Smartwatch (Wear OS & Apple Watch)
Supported watches
Ply3rs supports Wear OS watches (Samsung Galaxy Watch 4+, Google Pixel Watch, etc.) and Apple Watch. The companion app is installed automatically when you install Ply3rs on your phone.
What you can do on the watch
From your watch you can browse World Radio stations by country and play them directly. You can also browse and play local audio files (MP3, FLAC, AAC, etc.) stored on your paired phone.
Open Ply3rs on your watch
On Wear OS: press the watch crown and find 'Ply3rs' in the app list. On Apple Watch: press the Digital Crown and tap the Ply3rs icon. The watch app opens to a simple two-tab screen — Radio and Audio.
Play radio on your watch
Tap the Radio tab, choose a country from the list, then tap any station to start streaming. The audio plays through your phone's speaker or any connected Bluetooth headphones.
Play audio files on your watch
Tap the Audio tab to see your recent audio files. Tap any track to play it. Use the play/pause button on the watch face to control playback without taking out your phone.
Control playback from the watch
A Now Playing screen shows the current track or station with play/pause and skip controls. Swipe down to return to the main menu.
Smartwatch support is limited to Radio and Audio playback — no video or IPTV on the watch. Keep your phone nearby; the watch streams audio through the paired phone connection.
Settings
Language
Tap Settings (⚙) → Language to change the app display language. Supports Hebrew, English, Arabic, and more.
Info
Tap Settings → Info to see a guide on how to use all features of the app.
Rename or remove playlists
Tap the three-dot menu on any playlist card to rename or delete it.
All your settings are saved locally on your device. Nothing is uploaded to any server.
Web App (Browser)
Open the Web App
Visit ply3rs.com/web in any modern browser (Chrome, Safari, Edge, Firefox, Opera). No download or installation required.
IPTV — load your playlist
Click the IPTV tab, paste any M3U or Xtream Codes URL, and click Load. Your channels appear instantly in the browser player.
LiveTV — free public channels
Click the LiveTV tab to browse 35+ verified free public broadcast channels from multiple regions. Click any channel to start streaming.
World Radio
Click the Radio tab, choose a country from the list, then click any station to start streaming audio in the browser.
Local files
Click the Files tab and drag & drop any video or audio file from your computer into the player — no upload, playback is instant.
Code & Text Viewer
Click the Code tab and open any source code or text file. Syntax highlighting for 250+ languages is supported directly in the browser.
The Web App runs entirely in your browser — no account, no install. Works on desktop, tablet, and mobile browsers.
iPhone & iPad (iOS / iPadOS)
Coming SoonDownload from the App Store
Search for 'Ply3rs' in the App Store on your iPhone or iPad and tap Get. The app is free with no in-app purchases.
Open Ply3rs
Launch the app and you'll see the home screen with all feature cards: IPTV, LiveTV, Radio, Files, Photos, Network, Cloud, and more.
IPTV & LiveTV
Tap IPTV to add an M3U playlist or Xtream Codes. Tap LiveTV to browse free public broadcast channels — all stream directly in-app.
World Radio
Tap Radio, choose a country, and tap any station to stream. Full list of 120+ countries available.
Local & Cloud files
Browse files on your iPhone or iPad using the Files tab. Connect to iCloud Drive, Dropbox, Google Drive, or any SMB / FTP share.
iPhone & iPad support is coming soon. All core features — IPTV, Radio, Files, Cloud, and Skins — will be available on iOS and iPadOS.
Apple TV (tvOS)
Coming SoonInstall from the App Store on Apple TV
On your Apple TV, open the App Store, search for 'Ply3rs', and install. The app is optimized for the tvOS remote and Siri Remote.
Navigate with the Siri Remote
Use the touch surface to swipe and navigate. Click the center to select. Use the Menu button to go back.
IPTV & LiveTV on the big screen
Add your M3U playlist or Xtream Codes from the IPTV screen. Browse channels in a TV-optimized full-screen grid with 4K HDR support.
World Radio
Open the Radio tab, select a country, and start streaming. Audio plays through your TV's speakers or connected audio system.
Network Storage
Connect to your NAS or home server via SMB, FTP, or WebDAV and stream video, audio, and photos directly to your TV.
Apple TV support is coming soon. The tvOS interface will be fully remote-optimized with 4K HDR playback, IPTV, Radio, and NAS streaming.
macOS (Mac)
Coming SoonDownload from the Mac App Store
Search for 'Ply3rs' in the Mac App Store and click Get. Requires macOS 13 Ventura or later.
Open Ply3rs on your Mac
Launch Ply3rs from Launchpad or Applications. The interface adapts to the Mac's larger screen with a sidebar navigation layout.
Play local media
Drag any video, audio, or image file onto the Ply3rs window — or use File → Open. All 100+ container formats are supported.
IPTV & Network Streams
Add your M3U playlist from the IPTV section. Connect to NAS shares via SMB or FTP from the Network panel.
Code & Text Viewer
Open any source code file in the built-in viewer with syntax highlighting for 250+ languages.
macOS support is coming soon. Full feature parity with the Android app — IPTV, Radio, Files, Network Storage, Cloud, and Skins.
Windows 10 / 11
Coming SoonInstall from the Microsoft Store
Search for 'Ply3rs' in the Microsoft Store on Windows 10 or 11 and click Install. The app is free.
Open Ply3rs
Launch Ply3rs from the Start menu. The Windows interface uses a sidebar layout optimized for mouse and keyboard navigation.
Play local media
Drag video, audio, or image files into the Ply3rs window to play them. Right-click any file in Explorer and choose 'Open with Ply3rs'.
IPTV & Network Streams
Add your M3U playlist from the IPTV panel. Access NAS and shared folders via SMB directly from the Network section.
Code & Text Viewer
Open any text or source code file in the built-in syntax-highlighted viewer — 250+ languages supported.
Windows support is coming soon. Full feature set including IPTV, Radio, Files, Network Storage, Cloud, Skins, and 4K HDR playback.
Android Auto
Connect your phone to the car
Plug your Android phone into the car's USB port, or connect wirelessly if your car supports Wireless Android Auto. The car's screen switches to Android Auto mode automatically.
Launch Ply3rs from the car screen
Ply3rs appears in the Android Auto home screen. Tap the Ply3rs icon to open it directly on the car's display.
Browse World Radio by country
The Android Auto interface shows a simplified World Radio list — scroll through countries and select any station to start streaming.
Play hands-free
Audio plays through the car's speakers. Use the steering-wheel media buttons or voice controls to pause, resume, or skip to the next station.
Stay safe while driving
The Android Auto interface is designed for minimal distraction — large buttons, voice-friendly navigation. Keep your eyes on the road.
Android Auto requires Android 6.0+. World Radio playback via Android Auto is available now with Ply3rs on Google Play.
Apple CarPlay
Coming SoonConnect your iPhone to the car
Plug your iPhone into the car's USB port or connect wirelessly for Wireless CarPlay-enabled vehicles.
Launch Ply3rs from the CarPlay screen
Ply3rs will appear in the CarPlay home screen once the iOS app is installed. Tap it to open World Radio and audio controls.
Browse radio stations
Navigate through countries and select stations directly from the car's touchscreen or Siri voice commands.
Audio through car speakers
Stream radio directly to your car's audio system. Steering-wheel controls and Siri work seamlessly.
Apple CarPlay support arrives with the Ply3rs iOS app — coming soon.